| Developing ColdFusion MX Applications with CFML |
|
|
Building a Search Interface |
|
| Developing ColdFusion MX Applications with CFML |
|
|
Building a Search Interface |
|
There are three main tasks in creating a search tool for your ColdFusion application:
You can perform each task programmatically-that is, by writing CFML code. Alternatively, you can use the ColdFusion Administrator to create and index the collection. Also, ColdFusion Studio has a Verity Wizard that generates ColdFusion pages that index the collection and design a search interface. The following table summarizes the steps and available methods for creating the search tool:
| Step |
CFML |
ColdFusion MX Administrator |
Verity Wizard |
|---|---|---|---|
| Creating a collection |
Yes |
Yes |
No |
| Indexing a collection |
Yes |
Yes |
Yes |
| Designing a search interface |
Yes |
No |
Yes |
This chapter presents the non-code methods for developing a search tool, followed by code examples that perform the same task. If you have ColdFusion Studio and access to the ColdFusion Administrator, the fastest development method is as follows:
Use the following procedure to quickly create a collection with the ColdFusion Administrator:
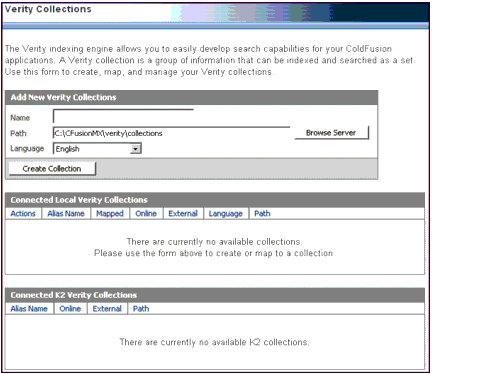
The Verity Collections page appears:
By default, ColdFusion stores collections in \cf_root\verity\collections\ in Windows and in /cf_root/verity/collections in UNIX.
Note: This is the location for the collection, not for the files that you will search.
The name and full path of the new collection appears in the list of Connected Verity Collections:
Note: You can map a collection currently available on your network or local disk by creating a local reference (an alias) for that collection. In this procedure, enter the collection alias as the collection name, and enter a UNC (Universal Naming Convention) path to the folder for the collection.
You have successfully created a collection, DemoDocs, that currently has no data. A collection becomes populated with data when you index it. For more information, see the next section, "About indexing a collection".
A new collection is an empty shell that must be indexed before you search it. The indexing procedure also populates the collection with data contained in the collection's files. Similar to creating a collection, you can index a collection either in the ColdFusion Administrator or programmatically.
Note: You can index and search against collections created outside of ColdFusion by using the external attribute of cfindex and cfsearch.
Use the following guidelines to determine which method to use:
The cfcollection tag has the following action attribute values that can fix or improve your index:
Documents are modified frequently in many user environments. After you index your documents, any changes that you make are not reflected in subsequent Verity searches until you reindex the collection. Depending on your environment, you can create a scheduled task to automatically keep your indexes current. For more information on scheduled tasks, see Administering ColdFusion MX.
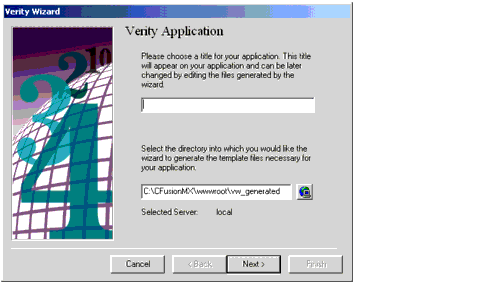
If you have ColdFusion Studio, you can use the Verity Wizard to generate a basic search and index interface. Use the following procedure to quickly create a search application for a collection. This procedure assumes the following:
The Verity Application window appears:
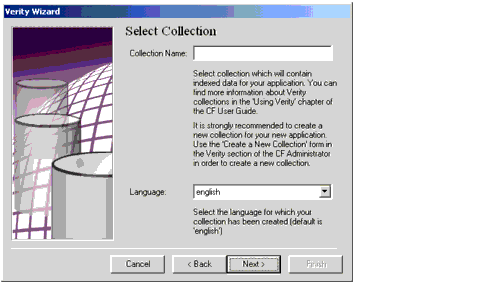
The Select Collection window appears:
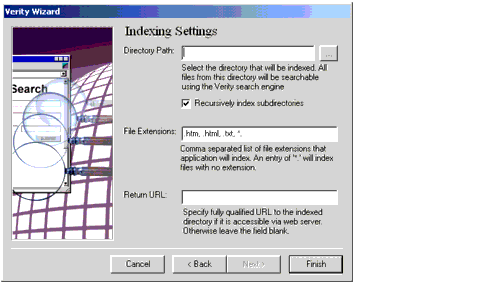
The Indexing Settings window appears:
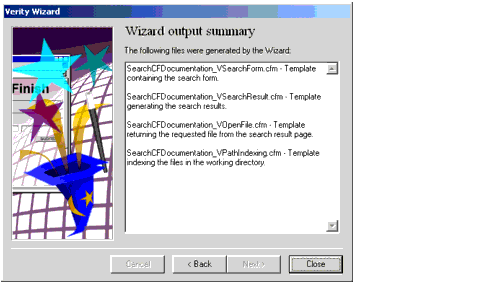
The wizard generates four ColdFusion pages to the directory you specified in step 4, and displays an output summary:
Note: The file names are in the format pagetitle_Vpagename.cfm, where pagetitle is the value you specified in step 4 and pagename is SearchForm, SearchResult, OpenFile, or PathIndexing.
The wizard closes and the files open in ColdFusion Studio (you can adjust its size to display all file tabs).
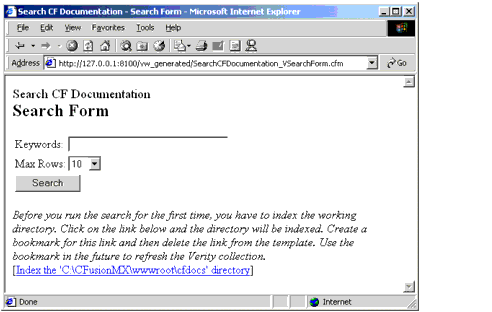
Alternatively, you can use the web browser; if you do so, enter an HTTP URL that corresponds to your SearchForm, such as:
http://127.0.0.1:8500/vw_generated/SearchCFDocumentation_VSearchForm.cfm:
A confirmation message appears when indexing successfully completes.
Tip: For more information on the Verity search syntax, see "Using Verity Search Expressions".
In ColdFusion Studio 4.x, the following compilation error might display:
Invalid parser construct found on line 46 at position 49. ColdFusion was looking at the following text:'
To correct this error, do the following:
<TR bgcolor="#IIf(CurrentRow Mod 2, DE('FFFFFF'), DE('FFFFCF'))#">
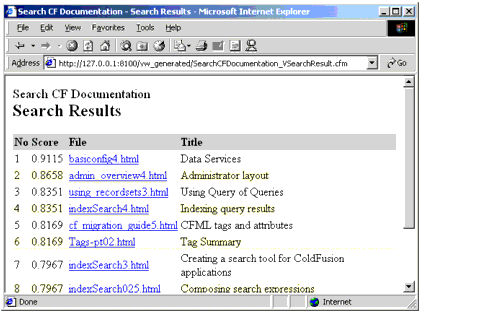
Your search results appear:
If you entered a Return URL value and your documents are beneath your web_root (as in this procedure), you can click the link to open them.
You now have Verity search capability for your ColdFusion application. You can edit the generated ColdFusion pages or copy the generated code into the current pages to better integrate with your application.
You can create a search interface without using the Verity Wizard. The remainder of this chapter describes how to write CFML code that is functionally identical to the pages generated by the wizard. You can write the code using your text editor and preview it in the web browser.
You can create a Verity search tool for your ColdFusion application in CFML. Although writing CFML code can take more development time than using these tools, there are situations in which writing code is the preferred development method.
The following are cases in which you might prefer using the cfcollection tag rather than the ColdFusion MX Administrator to create a collection:
When using the cfcollection tag, you can specify the same attributes as in the ColdFusion MX Administrator:
action attribute is list. For more information, see CFML Reference.
You can create a collection by directly assigning a value to the name attribute of the cfcollection tag, as shown in the following code:
<cfcollection action = "create"
  collection = "a_new_collection"
  path = "c:\CFusionMX\verity\collections\">
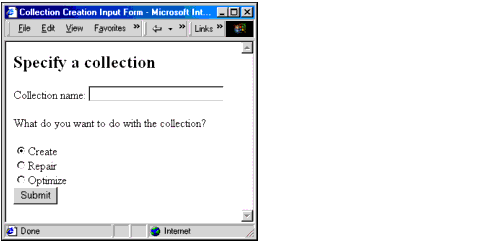
If you want your users to be able to dynamically supply the name and location for a new collection, use the following procedures to create form and action pages.
<html>
<head>
  <title>Collection Creation Input Form</title>
</head>

<body>
<h2>Specify a collection</h2>
<form action="collection_create_action.cfm" method="POST">

  <p>Collection name:
  <input type="text" name="CollectionName" size="25"></p>

  <p>What do you want to do with the collection?</p>
  <input type="radio"
    name="CollectionAction"
    value="Create" checked>Create<br>
  <input type="radio"
    name="CollectionAction"
    value="Repair">Repair<br>
  <input type="radio"
    name="CollectionAction"
    value="Optimize">Optimize<br>
  <input type="submit"
    name="submit"
    value="Submit">
</form>

</body>
</html>
Note: The form will not work until you write an action page for it, which is the next procedure.
<html>
<head>
  <title>cfcollection</title>
</head>

<body>
<h2>Collection creation</h2>

<cfoutput>

  <cfswitch expression=#Form.collectionaction#>
    <cfcase value="Create">
      <cfcollection action="Create"
      collection="#Form.CollectionName#"
      path="c:\cfusionmx\verity\collections\">
      <p>The collection #Form.CollectionName# is created.
    </cfcase>

    <cfcase value="Repair">
      <cfcollection action="Repair"
      collection="#Form.CollectionName#">
      <p>The collection #Form.CollectionName# is repaired.
    </cfcase>

    <cfcase value="Optimize">
      <cfcollection action="Optimize"
      collection="#Form.CollectionName#">
      <p>The collection #Form.CollectionName# is optimized.
    </cfcase>

    <cfcase value="Delete">
      <cfcollection action="Delete"
      collection="#Form.CollectionName#">
      <p>Collection deleted.
    </cfcase>
  </cfswitch>
</cfoutput>
</body>
</html>
http://127.0.0.1/myapps/collection_create_form.cfm
The following figure shows how the output appears:
The name and full path of the new collection appears in the list of Connected Verity Collections.
You successfully created a collection, named CodeColl, that currently has no data. For information on indexing your collection using CFML, see "Indexing a collection using the cfindex tag".
You can index a collection in CFML using the cfindex tag, which eliminates the need to use the ColdFusion MX Administrator. When using this tag, the following attributes correspond to values entered in the ColdFusion MX Administrator:
type="Path".type="path".type="file" and type="path". When the collection is searched with cfsearch, the pathname is automatically prefixed to filenames and returned as the url attribute. type = "Path", that directories below the path specified in the key attribute are included in the indexing operation. You can use form and action pages similar to the following examples to select and index a collection.
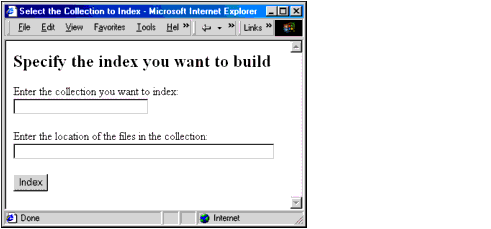
<html>
<head>
  <title>Select the Collection to Index</title>
</head>
<body>

<h2>Specify the index you want to build</h2>

<form method="Post" action="collection_index_action.cfm">
  <p>Enter the collection you want to index:
  <input type="text" name="IndexColl" size="25" maxLength="35"></p>
  <p>Enter the location of the files in the collection:
  <input type="text" name="IndexDir" size="50" maxLength="100"></p>

  <input type="submit" name="submit" value="Index">

</form>

</body>
</html>
Note: The form will not work until you write an action page for it, which is the next procedure.
<html>
<head>
<title>Creating Index</title>
</head>
<body>
<h2>Indexing Complete</h2>

<cfindex collection="#Form.IndexColl#"
  action="refresh"
  extensions=".htm, .html, .xls, .txt, .mif, .doc"
  key="#Form.IndexDir#"
  type="path"
  urlpath="#Form.IndexDir#"
  recurse="Yes"
  language="English">

<cfoutput>
  The collection #Form.IndexColl# has been indexed.
</cfoutput>
</body>
</html>
http://127.0.0.1/myapps/collection_index_form.cfm
The following figure shows how the output appears:
A confirmation message appears upon successful completion.
Note: For information about using the cfindex tag with a database to index a collection, see "Using database-directed indexing".
As an alternative to programmatically indexing a collection and to using the Verity Wizard, use the following procedure to quickly index a collection with the ColdFusion Administrator.
This step lets you create a link to any of the files in the index; for example,
http://127.0.0.1/vw_files/.
For more information, see "Support for international languages".
The indexing process. On completion, the Verity Collections page appears.
Note: The time required to generate the index depends on the number and size of the selected files in the path.
This interface lets you easily build a very specific index based on the file extension and path information you enter. In most cases, you do not need to change your server file structures to accommodate the generation of indices.